1. ERLANG INSTALLATION
RabbitMQ runs on the Erlang virtual runtime, so we need to install Erlang first as without it we can't get RabbitMQ to work. Download Erlang at http://www.erlang.org/downloads
Ensures that the appropriate environment variable (ERLANG_HOME) has been created during the installation. If, for any reason, the environment variable is missing, you will need to create it manually.
2. RABBITMQ SERVICE INSTALLATION
Download and install Rabbit Service at http://www.rabbitmq.com/install-windows.html
3. RABBITMQ WEB MANAGEMENT PLUGIN ENABLE
RabbitMQ runs, by default, as a Windows Service and technically you shouldn’t need to do anything else to start interacting with it. However, any interaction with the service needs to happen over the command-line.
Open command line tool (Run as Administrator). The tool is located at C:\Program Files (x86)\RabbitMQ Server\rabbitmq_server-3.3.4\sbin
Run the following command to enable the plugin rabbitmq-plugins.bat enable rabbitmq_management
Then, re-install the RabbitMQ service using the commands below
rabbitmq-service.bat stop
rabbitmq-service.bat install
rabbitmq-service.bat start
To check if everything worked as expected, navigate to http://localhost:15672/mgmt. You will be prompted for username and password. The default credentials are:
Username: guest
Password: guest
4. INSTALL HANDLE.EXE FOR RABBITMQ’S FILE DESCRIPTORS
When you first log in to the RabbitMQ web dashboard, under the Overview tab you will notice that in the File descriptors field there is a question mark about the missing Handle.exe. Handle.exe enables RabbitMQ to monitor the local file system. It will still work without it but I think that it's better to make it available, so let’s go and get it at here
Download the zip file and unzip it anywhere you want. I decided to extract mine in C:\Program Files\Handle. It is important that you keep a note of the extracted path as we will need to add it to PATH environment variable so it is available to RabbitMQ.
Open the Environment Variables Windows, scroll down to the System Variables -> Path variable and click on Edit. At the end of the Variable Value, add the path to the Handle.exe by the path above
Restart the RabbitMQ
rabbitmq-service.bat stop
rabbitmq-service.bat start
5. SETUP
Now it is time to get it setup. The next batch script that we are going to use is rabbitmqctl.bat. This is the batch script that we are going to use to control and get stats on the server.
Run the command: rabbitmqctl status
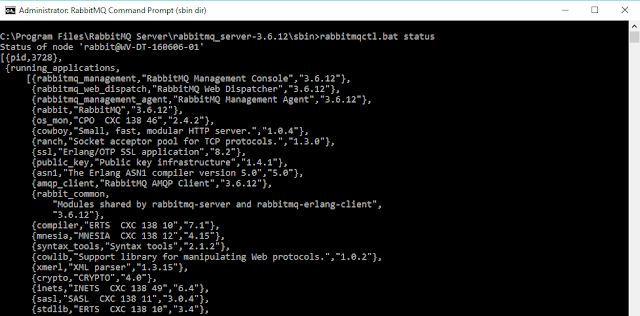
You can now be sure that your RabbitMQ server is up and running, ready to server requests
The first thing you should consider doing, especially if your instance of RabbitMQ is publicly accessible, is to secure it a bit. If you run the command, rabbitmqctl list_users you will see that your server has a single user named “guest”. This is the default user that RabbitMQ creates, and it has full rights to the RabbitMQ instance. You might want to start off by creating a new user with a password and granting that user full rights. We can do this by running these commands:
rabbitmqctl add_user [username] [password]
rabbitmqctl set_permissions justin “.*” “.*” “.*”
The first command creates a new user with a password. The second tells RabbitMQ to grant the user configure, write, and read permissions to all queues
Now you can run: rabbitmqctl delete_user guest to delete guest
6. GET .NET RABBITMQ CLIENT
You can get RabbitMQ Client from Visual Studio with NuGet tool or go to the page at http://www.rabbitmq.com/dotnet.html to download it
Now, you are ready for coding!
Prefer this link for samples https://dotnetcodr.com/messaging/
Environment variables are, in short, variables that describe the environment in which programs run. They are used by all kinds of programs to answer questions like: What is the name of the computer where I am installed? What is the name of the user account that is running me? What is my current working directory? Where is Windows installed? Where are the temporary files stored on this computer? Where is the OneDrive folder for this user account?
In Windows, environment variables have a name and value. For example, the variable windir (short for "Windows directory") may have the value "C:\Windows" or another path where Windows is installed.
Another common variable is named PATH. Many programs need to know where to find certain files, and the PATH variable tells them where they can find what they need. Those programs look for a PATH variable automatically, so you don’t have to type it all in every time you run the program. This variable has a value consisting of many user directories. These directories are set by the different programs that are installed on the computer, and they vary widely from system to system.
The concept of environment variables exists in most operating systems, from Linux to OS X to Windows. In principle, they mean the same thing but the way they are implemented and used differs.
Types of environment variables: User and System
There are two types of variables: user variables, specific to each user account, and system variables that apply to all user accounts.
User environment variables have values that differ from user to user. As their name implies, they are specific to your user account, and they store user specific data, like the location of your user profile, the folder where temporary files are stored for your account, the location of your OneDrive folder, and so on. They can be edited by that user account but not by other user accounts. These variables can be set by the user, by Windows or by different programs working with user specific locations.
System variables are global and cannot be changed by any user. Their values are the same for all user accounts. They refer to locations of critical system resources, like the folder where Windows is installed, the location of Program Files, and so on. These variables are set by Windows, by different programs and drivers.
How to find the environment variables in Windows
In Windows 10, use Cortana’s search box and type environment. Then, click or tap on the “Edit the system environment variables” search result.
In Windows 7, type environment in the Start Menu search box and two search results are displayed: “Edit environment variables for your account” and “Edit the system environment variables.” Click on either of them.
In Windows 8.1, type the word environment while on the Start screen, and two search results are displayed: “Edit environment variables for your account” and “Edit the system environment variables.” Click or tap either of them
The Environment Variables window is opened. There are some minor visual differences between Windows versions.The options and buttons available are the same and work the same way, no matter which Windows version you are using.
How to access the environment variables from the Control Panel
How to access the environment variables from the Run window
How to view environment variables in the Command Prompt
Open cmd then type command: SET, without any other parameters, and press Enter.
How to view environment variables in the PowerShell
Open it, type the command Get-ChildItem Env: then press Enter.
Conclusion
As you can see from this tutorial, environment variables are neither easy to find nor visible in any way, while working with Windows programs. They are managed in the background by the operating system and the different programs and drivers you install. However, they are essential to the proper operation of the operating system and of your installed apps. If you change the value of important system variables, without knowing what you are doing, you will get to experience just how important these environment variables are, by causing your system to malfunction
The purpose of SQL Server index is pretty much the same as the book index. It allows you to get to the information quickly, instead of navigating through the book.
SQL Server indexes are created on a COLUMN level in both tables and views. Its aim is to provide a “quick to locate” data based on the values within indexed columns.
If an index is created on the primary key, whenever a search for a row based on one of the primary key values is performed.
The SQL Server will locate searched value in the index, and then use that index to locate the entire row of data.
This means that the SQL Server does not have to perform a full table scan when searching for particular row, which is much more performance intensive task –consuming more time, and using more SQL Server resources.
Relational indexes can be created even before there is data in the specified table, or even on tables and views in another database.
After indexes are created, they will undergo automatic maintenance by the SQL Server Database Engine whenever insert, update or delete operations are executed.
These automatic modifications will continuously scatter the information in the index throughout the database – fragmenting the index over time.
The result – indexes now have more pages where logical ordering (based on the key value) differs from the physical ordering inside the data file.
This means that there is a high percentage of free space on the index pages, and that SQL Server has to read higher number of pages when scanning each index.
Also, ordering of pages that belong to the same index gets scrambled and this adds more work to the SQL Server when reading an index – especially in IO terms.
The Index Fragmentation impacts the SQL Server can range from decreased efficiency of queries, for servers with low performance impact,
all the way to the point where SQL Server completely stops using indexes and resorts to the last-straw solution, full table scans for each and every query.
As mentioned before, full table scans will drastically impact SQL Server performance and this is final alarm to remedy index fragmentation on the SQL Server.
The solution for fragmented indexes is to REBUILD or REORGANIZE indexes.
But, before considering maintenance of indexes, it is important to answer two main questions:
1. What is the degree of fragmentation?
2. What is the appropriate action? Reorganize or rebuild?
Detecting fragmentation
Generally, in order to solve any problem, it is essential to first and foremost locate it, and isolate affected area before applying the correct remedy.
Fragmentation can be easily detected by running the system function sys.dm_db_index_physical_stats which returns the size and the fragmentation information for the data and indexes of tables or views in SQL Server. It can be run only against a specific index in the table or view, all indexes in the specific table or view, or vs. all indexes in all databases:
The results returned after running the procedures include following information:
- avg_fragmentation_in_percent – average percent of incorrect pages in the index
- fragment_count – number of fragments in index
- avg_fragment_size_in_pages – average number of pages in one fragment in an index
Analyzing detection results
After the fragmentation has been detected, the next step is to determine its impact on the SQL Server and what action should be taken.
There is no exact information on the minimal amount of fragmentation that affects the SQL Server in specific way to cause performance congestion, especially since the SQL Server environments greatly vary from one system to another.
However, there is a generally accepted solution based on the percent of fragmentation (avg_fragmentation_in_percent column from the previously described sys.dm_db_index_physical_stats function)
- Fragmentation is less than 10% – no de-fragmentation is required. It is generally accepted that in majority of environments index fragmentation less than 10% in negligible and its performance impact on the SQL Server is minimal.
- Fragmentation is between 10-30% – it is suggested to perform index reorganization
- Fragmentation is higher than 30% – it is suggested to perform index rebuild
Here is the reasoning behind the thresholds above which will help you to determine if you should perform index rebuild or index reorganization:
Index reorganization is a process where the SQL Server goes through existing index, and cleans it up. Index rebuild is a heavy-duty process where index is deleted and then recreated from scratch with entirely new structure, free from all piled up fragments and empty-space pages.
While index reorganization is a pure cleanup operation which leaves system state as it is without locking-out affected tables and views, the rebuild process locks affected table for the whole rebuild period, which may result in long down-times that could not be acceptable in some environments.
With this in mind, it is clear that the index rebuild is a process with ‘stronger’ solution, but it comes with a price – possible long locks on affected indexed tables.
On the other side, index reorganization is a ‘lightweight’ process that will solve the fragmentation in a less effective way – since cleaned index will always be second to the new one fully made from scratch. But reorganizing index is much better from the efficiency standpoint, since it does not lock affected indexed table during the course of operation.
Servers with regular maintenance periods (e.g. regular maintenance over weekend) should almost always opt for the index rebuild, regardless of the fragmentation percent, since these environments will hardly be affected by the table lock-outs imposed by index rebuilds due to regular and long maintenance periods.
How to reorganize and rebuild index:
Using SQL Server Management Studio:
- In the Object Explorer pane navigate to and expand the SQL Server, and then the Databases node
- Expand the specific database with fragmented index
- Expand the Tables node, and the table with fragmented index
- Expand the specific table
- Expand the Indexes node
- Right-click on the fragmented index and select Rebuild or Reorganize option in the context menu (depending on the desired action):
- Click the OK button and wait for the process to complete
Reorganize indexes in a table using Transact-SQL
USE MyDatabase;

GO


ALTER INDEX ALL ON MyTable REORGANIZE;

GO
Rebuild indexes in a table using Transact-SQL
USE MyDatabase;

GO


ALTER INDEX ALL ON MyTable REBUILD;

GO
Rebuild or reorganize indexes with ApexSQL Backup
Final option when rebuilding or reorganizing SQL Server indexes is to use ApexSQL Backup – a tool for database jobs management and automation.
ApexSQL Backup allows users to perform and schedule index de-fragmentation jobs from user-friendly graphical user interface. In addition to automation features, which allow the user to perform regular maintenance on their indexes, ApexSQL Backup allows rebuilding/reorganizing indexes on multiple tables/views at once. Additionally, ApexSQL Backup can send an email notification on job completion. Additionally, all scheduled jobs, as well as completed activities can be inspected and altered from the comprehensive view screens.
To schedule index reorganize/rebuild job with ApexSQL Backup, do the following:
- Start the application
- In the main ribbon choose appropriate index defragmentation job:
- Provide SQL Server and database details, choose tables and views to be included in the defragmentation job and click the OK button:
- To provide schedule details, click on the Schedules radio button, and chose schedule frequency and duration, and then click the Create button:
- To complete the schedule, click on the Create button:
With this, the reorganize/rebuild job has been created and will be executed as per specified schedule. All scheduled jobs can be seen in the Schedules pane.
Source from
https://solutioncenter.apexsql.com/why-when-and-how-to-rebuild-and-reorganize-sql-server-indexes/


